
How To Set Up Pre-Caching In Hyper PWA
Pre-Caching allows Hyper PWA to automatically cache important pages and resources during the service worker installation process. This helps improve loading speed and ensures selected content remains available even when the user has limited or no internet connectivity.
With Hyper PWA, you can pre-cache content using:
- Post Types
- Specific Post Selection
- Manual URLs
What Is Pre-Caching?
Pre-caching downloads and stores selected pages in the browser cache when the service worker is installed.
Benefits include:
- Faster page loading
- Improved user experience
- Better offline support
- Reduced server requests for frequently accessed content
Hyper PWA provides flexible controls so you can decide exactly which content should be available from cache.
Step 1: Open Hyper PWA Dashboard
Log in to your WordPress administration area.
Navigate to:
Hyper PWA → Core Features
Open the Pre Caching accordion section.
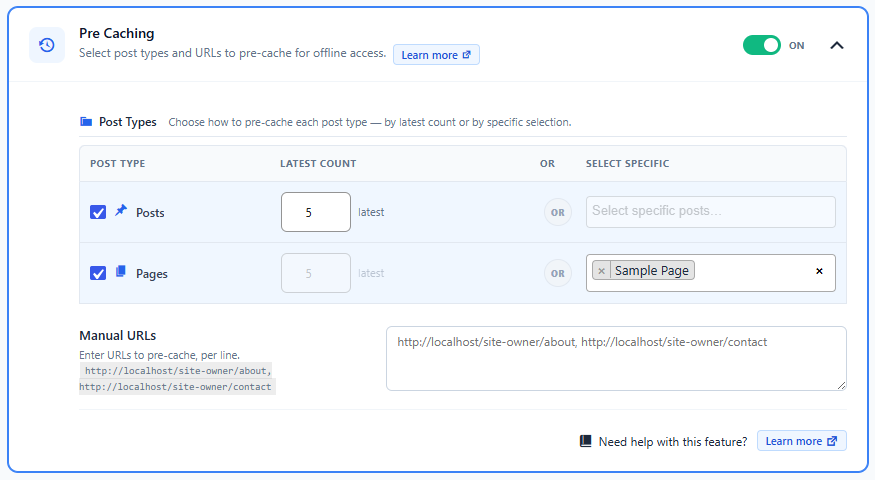
Step 2: Enable Pre-Caching Configuration
Inside the Pre Caching section, you will find the available caching options.
These options allow you to choose:
- Which post types should be cached
- How many latest posts should be cached
- Specific posts that should be cached
- Additional custom URLs to cache
Step 3: Save Settings
After configuring your pre-caching rules:
- Click Save Settings
- Wait for the settings to be stored successfully
Step 4: Refresh the Service Worker
After changing pre-caching settings, the service worker must be updated.
To ensure the new cache list is generated:
- Open your website in a new tab
- Hard refresh the page
Windows:
Ctrl + F5Mac:
Cmd + Shift + RThe updated service worker will install and download the newly configured resources.
How To Verify Pre-Caching Is Working
There are several ways to verify that Hyper PWA has successfully pre-cached your content.
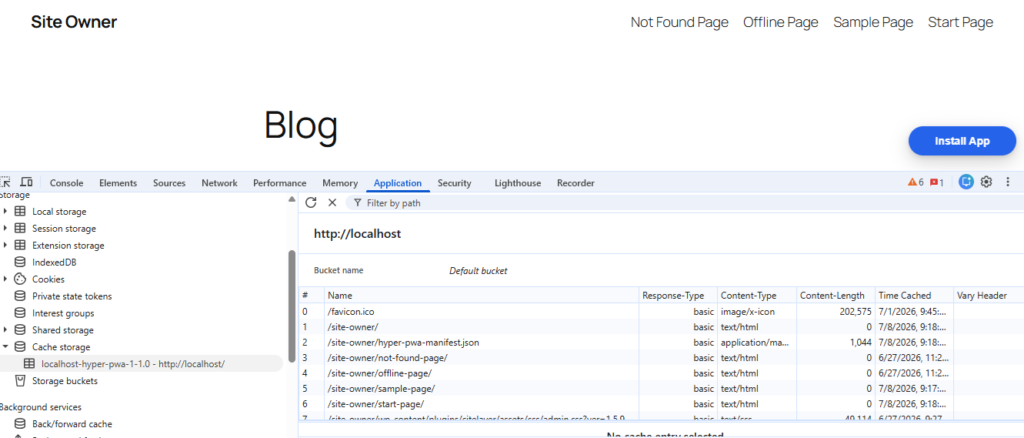
Method 1: Verify Using Chrome DevTools Cache Storage
Open your website in Google Chrome.
Steps
- Press F12
- Open the Application tab
- Expand Cache Storage
- Select the Hyper PWA cache
You should see cached URLs that match your:
- Selected post types
- Specific posts
- Manual URLs
Method 2: Verify Using the Network Panel
Open Chrome DevTools.
Steps
- Press F12
- Open the Network tab
- Refresh the page multiple times
When pre-caching is working correctly, some resources may be served from:
- Service Worker
- Memory Cache
- Disk Cache
Depending on your caching strategy and browser behavior.
Method 3: Test Offline Mode
This is the easiest way to verify pre-cached pages.
Steps
- Open Chrome DevTools
- Navigate to the Network tab
- Change the network status to Offline
- Visit a page that was configured for pre-caching
If the page was successfully pre-cached:
- The page should continue loading
- Content should be visible
- Static assets may load from cache
Expected Result
A selected pre-cached page should remain accessible even without an internet connection.
Best Practices
For optimal performance, consider pre-caching:
- Homepage
- About Us page
- Contact page
- Documentation pages
- Frequently visited landing pages
- Important product pages
Avoid pre-caching a very large number of pages unless necessary, as this can increase installation time and cache size.