
How To Create A Multilingual Progressive Web App With Hyper PWA
Reaching a global audience means speaking your visitors’ language — literally. Hyper PWA’s Multilingual feature lets you serve your Progressive Web App in multiple languages based on each user’s locale or personal preference, without rebuilding your PWA from scratch. This guide walks you through what the feature does, how to enable it, and how to configure it with the translation plugin you already use.
What Is the Multilingual Feature?
The Multilingual feature in Hyper PWA automatically detects the language layer already running on your WordPress site (through a supported translation plugin) and extends it into your installable PWA.
The core mechanism works like this: whichever language a visitor is browsing your site in at the moment they tap “Add to Home Screen” (or “Install App”) is the language that gets locked into that installed PWA instance. In other words:
- The “Add to Home Screen” action is language-aware — it captures the visitor’s currently selected language (whether that’s their browser/locale default, or a language they manually switched to using your site’s language switcher).
- The installed app icon, name, short name, splash screen, and in-app interface are generated in that specific language at the moment of install.
- Two visitors on the same site — one browsing in English, one who switched to Spanish — can each tap “Add to Home Screen” and end up with two independently installed PWAs, each locked to the language they were viewing at install time.
- If a visitor later switches languages on your website but doesn’t reinstall, their already-installed home screen app keeps the language it was installed with. To get the new language on the home screen icon, they need to switch languages on the site first, then add it to the home screen again.
This gives every user a personalized, single-language installed app experience without you needing to maintain separate PWA builds per language. Hyper PWA handles it dynamically at the point of install.
Where To Find It
- Log in to your WordPress admin dashboard.
- Navigate to Hyper PWA in the left sidebar.
- Click Premium Features.
- Select Multilingual from the list of premium features.
Path: Hyper PWA → Premium Features → Multilingual
Step 1: Upgrade to Premium
Before anything else, confirm you’re on a Hyper PWA Premium plan:
- Visit https://hyperpwa.com/premium/.
- Choose the plan that fits your site (check that the plan tier includes the Multilingual add-on if plans are tiered).
- Complete checkout and activate your license key inside Hyper PWA → Settings → License (or the equivalent license activation screen in your installed version).
- Return to Hyper PWA → Premium Features → Multilingual — the toggles should now be interactive instead of greyed out.
Step 2: Turn On the Multilingual Master Switch
At the top of the Multilingual panel, you’ll see:
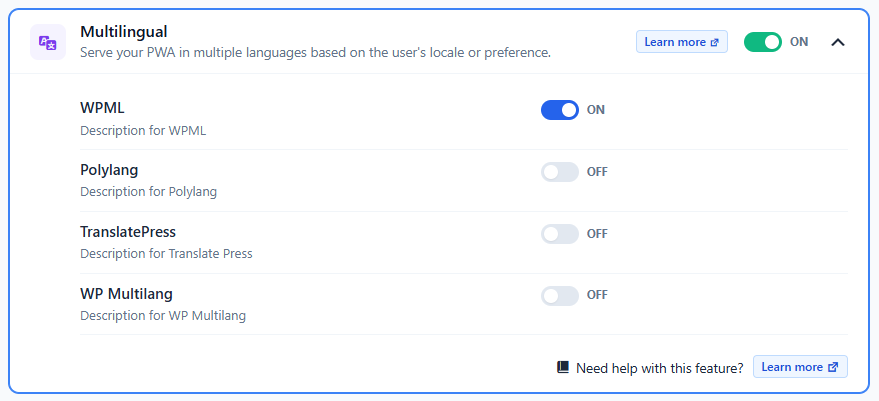
Multilingual — Serve your PWA in multiple languages based on the user’s locale or preference.
Next to it is a master ON/OFF toggle.
- Click the toggle so it switches to ON (it turns green).
- This activates the entire Multilingual module and reveals the list of supported translation plugins below it.
Step 3: Choose Your Translation Plugin
Hyper PWA doesn’t reinvent translation, it integrates with the translation plugin you’re already using (or plan to install) on your WordPress site. The panel lists four supported options, each with its own independent ON/OFF toggle:
| Plugin | Description |
|---|---|
| WPML | Integrates with the WPML multilingual plugin, syncing its language configuration into your PWA. |
| Polylang | Integrates with Polylang, one of the most popular free/freemium multilingual plugins for WordPress. |
| TranslatePress | Integrates with TranslatePress, which translates content visually/in real time. |
| WP Multilang | Integrates with WP Multilang for managing multiple language versions of your content. |
How to enable a plugin integration:
- Install and activate your chosen translation plugin on WordPress first (e.g., WPML, Polylang, TranslatePress, or WP Multilang), and configure the languages you want to support within that plugin.
- Return to Hyper PWA → Premium Features → Multilingual.
- Find the plugin you’re using in the list.
- Toggle it ON (it will turn blue/dark and display ON).
- Leave all other plugin integrations OFF — you should only enable the one matching the translation plugin actually installed on your site, to avoid conflicting configurations.
Important: Only enable the toggle for the translation plugin you have installed and actively use. Running multiple toggles on simultaneously without the corresponding plugins installed can cause language detection conflicts inside the PWA shell.
Step 4: Configure Language Settings in Your Translation Plugin
Since Hyper PWA reads its language data from your translation plugin, most of the actual language setup happens there:
- WPML: Set your default language and secondary languages under WPML → Languages. Ensure each language has proper URL/locale mapping (subdirectory, subdomain, or parameter-based).
- Polylang: Add languages under Languages → Languages, and make sure each page/post has translated versions linked together.
- TranslatePress: Set default and translation languages under Settings → TranslatePress → General.
- WP Multilang: Configure your languages under WP Multilang → Settings → Languages.
Once your plugin has active languages and translated content, Hyper PWA will pick these up automatically for the PWA manifest, app name/short name translations, and in-app content.
Step 5: Verify That “Add to Home Screen” Captures the Selected Language
This is the step that confirms the feature is actually working, since the language is locked in at the moment of install:
- Use your site’s language switcher (powered by WPML, Polylang, TranslatePress, or WP Multilang) to switch to one of your configured secondary languages — do this before installing.
- Confirm the page content has actually switched to that language.
- Tap “Add to Home Screen” / “Install App” while still on that language version of the site.
- Check the resulting home screen icon and app name — they should appear in the language you had selected at the moment of install, not your browser’s default or system locale.
- Repeat the test by switching to a different language and installing again (on a different browser profile or device) to confirm each install correctly reflects the language active at that time.
- Open the installed app and confirm the splash screen and interface text also match the language selected at install time.
Step 6: Test Across Devices and Languages
Since the language is tied to the site’s language at the time of install (not just system locale), test the install flow itself on each platform:
- Desktop Chrome/Edge: Switch the site language using your translation plugin’s switcher, then click the install icon in the address bar. Confirm the installed app matches that language.
- Android: Switch the site language in-browser, tap “Add to Home Screen,” and confirm the home screen icon label matches the language selected at that moment — not the device’s system language.
- iOS Safari: Switch the site language, then use Share → “Add to Home Screen.” Confirm the resulting icon/app name matches the language shown on screen at the time, since iOS home screen apps do not update dynamically afterward.
If a language isn’t appearing correctly:
- Double-check the plugin toggle in Hyper PWA matches the plugin actually installed.
- Confirm the language has fully translated content (untranslated strings often fall back to the default language).
- Make sure the language was actually switched on the site before tapping “Add to Home Screen” — installing while still on the default language will lock in the default language, regardless of the visitor’s browser/system settings.
- Clear your PWA cache/service worker and reinstall the app to force a fresh manifest capture in the correct language.