How to Configure Mobile and Desktop Screenshots in Hyper PWA
The Screenshots feature in Hyper PWA allows you to add screenshots of your Progressive Web App (PWA) directly to the web app manifest. These screenshots can be displayed by supported app stores, browsers, and installation prompts, helping users preview your application before installing it.
Hyper PWA supports two screenshot form factors:
- Form Factor – Narrow (Mobile Screenshots)
- Form Factor – Wide (Desktop & Tablet Screenshots)
Note: Screenshots are optional but highly recommended. They make your PWA installation experience more engaging and can improve user confidence before installation.
Why Use PWA Screenshots?
Adding screenshots provides several benefits:
- Showcase your application’s interface before installation.
- Improve the installation experience in supported browsers.
- Help users understand your app’s features visually.
- Increase trust by presenting a polished app listing.
- Required or recommended by some app distribution platforms.
Accessing the Screenshots Settings
Navigate to:
Hyper PWA → Core Features → Screenshots
Screenshot Placeholder
[ Screenshot: Hyper PWA → Core Features → Screenshots ]You will find two separate screenshot sections.
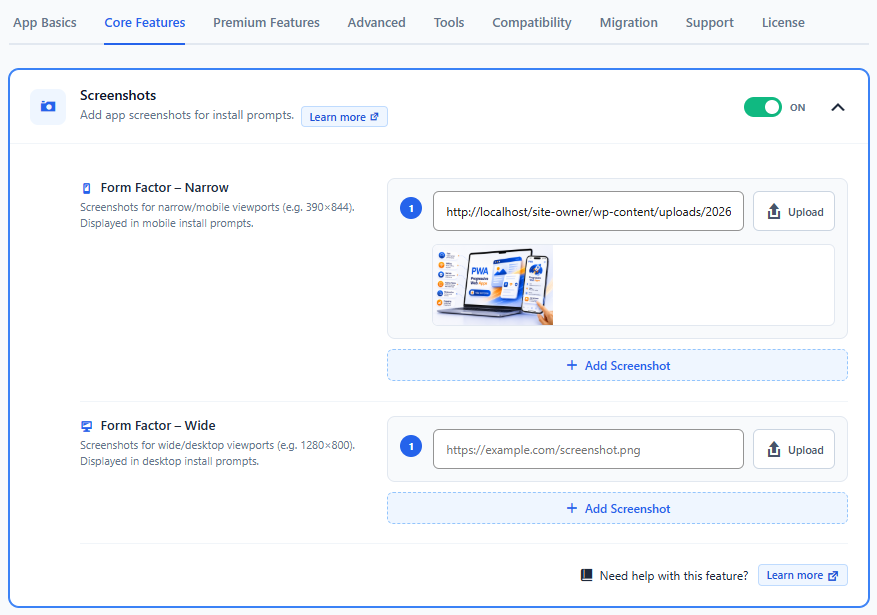
Form Factor – Narrow
The Narrow form factor is intended for mobile phone screenshots.
These screenshots represent how your application appears on smartphones in portrait orientation.
Recommended Image Size
Although Hyper PWA accepts standard image uploads, using consistent dimensions provides the best results.
Recommended:
- 1080 × 1920 px
- 720 × 1280 px
- Portrait orientation
- PNG or JPEG
How To Add Mobile Screenshots
- Open the Form Factor – Narrow section.
- Click Add Screenshot.
- Upload a mobile screenshot from the WordPress Media Library or your computer.
- Repeat the process to add additional screenshots.
- Save your settings.
Form Factor – Wide
The Wide form factor is designed for desktop and tablet screenshots.
These screenshots show how your application appears on larger screens.
Recommended Image Size
Suggested dimensions:
- 1920 × 1080 px
- 1366 × 768 px
- Landscape orientation
- PNG or JPEG
How To Add Desktop Screenshots
- Open the Form Factor – Wide section.
- Click Add Screenshot.
- Upload desktop or tablet screenshots.
- Add as many screenshots as needed.
- Save your settings.
How Screenshots Are Used
When screenshots are added, Hyper PWA automatically includes them in your PWA’s Web App Manifest.
A simplified example:
{
  "screenshots": [
    {
      "src": "/uploads/mobile-home.png",
      "sizes": "1080x1920",
      "type": "image/png",
      "form_factor": "narrow"
    },
    {
      "src": "/uploads/desktop-home.png",
      "sizes": "1920x1080",
      "type": "image/png",
      "form_factor": "wide"
    }
  ]
}
You do not need to edit the manifest manually—Hyper PWA generates the required entries automatically.
Supported Form Factors
| Form Factor | Intended Device | Orientation |
|---|---|---|
| Narrow | Smartphones | Portrait |
| Wide | Desktop, Laptop, Tablet | Landscape |
Testing Your Screenshots
After saving your settings:
- Clear your browser cache if necessary.
- Open your website.
- Open the generated
hyper-pwa-manifest.json (or your site’s manifest URL). - Look for the
screenshotssection. - Verify that both narrow and wide screenshots are listed correctly.
You can also inspect the manifest in Google Chrome:
- Open your website in Chrome.
- Press F12 to open Developer Tools.
- Go to the Application tab.
- Select Manifest from the left sidebar.
- Scroll to the Screenshots section to verify that your uploaded images appear with the correct form factors.
Troubleshooting
Screenshots do not appear
- Make sure you have uploaded valid image files.
- Save the Hyper PWA settings after making changes.
- Clear your browser cache.
- Refresh the manifest.