How To Generate QR Codes For PWA Installation
Feature: App Install QR Location: Hyper PWA → Premium Features → App Install QR Access level: Premium
🔒 This is a Premium feature. To access App Install QR, you’ll need to upgrade to Hyper PWA Premium. Upgrade to Premium to unlock this and other advanced features.
Overview
The App Install QR feature lets you generate a QR code that visitors can scan to instantly reach a dedicated install page for your Progressive Web App (PWA). Instead of explaining to users how to “Add to Home Screen” or find your app in a browser menu, you give them a single QR code — scan it, land on a branded install page, tap one button, and the app installs.
This is especially useful for:
- Print materials (flyers, posters, business cards, packaging)
- In-store displays or counter signage
- Presentations and pitch decks
- Email signatures and newsletters
- Any place where typing a URL isn’t practical
Once generated, the QR code can be placed anywhere on your site using a simple shortcode, and it can also be downloaded as an image file for use off-site.
Step 1: Enable the Feature
- Go to Hyper PWA → Premium Features → App Install QR.
- Toggle the switch in the top-right corner of the panel to ON.
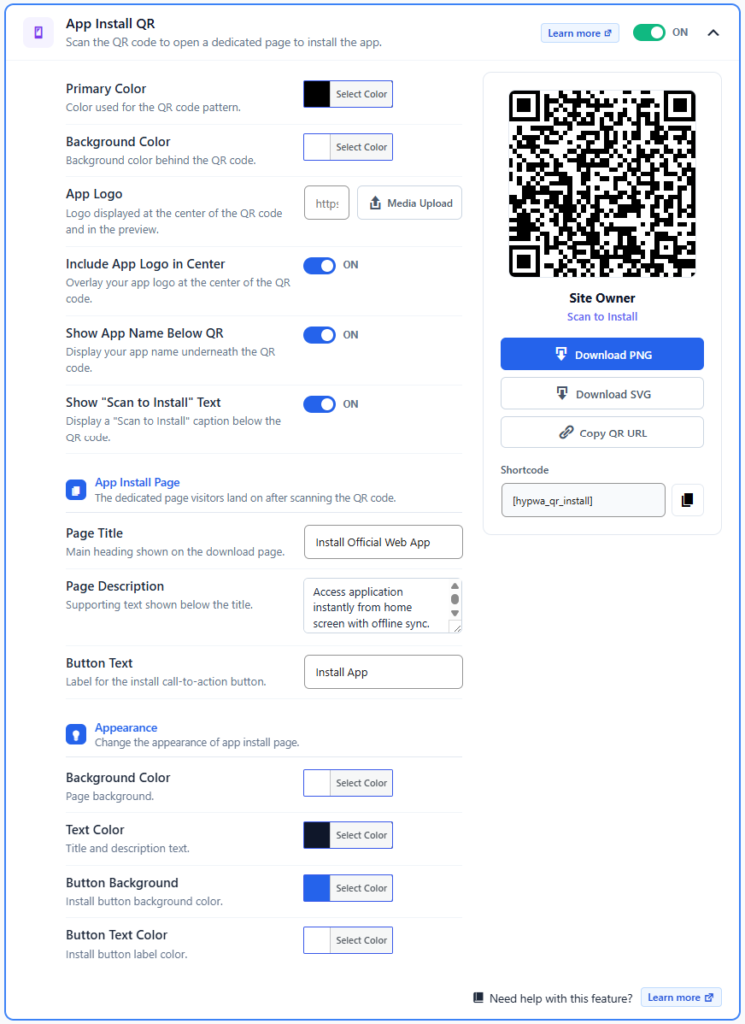
When enabled, a live preview of your QR code appears on the right-hand side of the settings panel, updating automatically as you customize the options.
Step 2: Customize the QR Code Appearance
The App Install QR section controls how the QR code itself looks:
| Setting | Description |
|---|---|
| Primary Color | The color used for the QR code pattern (the scannable dots/squares). |
| Background Color | The background color behind the QR code. |
| App Logo | Upload an image (or paste a URL) to display your app’s logo at the center of the QR code and in the preview panel. |
| Include App Logo in Center | Toggle to overlay your logo at the center of the QR code. |
| Show App Name Below QR | Toggle to display your app’s name underneath the QR code image. |
| Show “Scan to Install” Text | Toggle to display a “Scan to Install” caption below the QR code. |
Tip: Keep good contrast between your Primary Color and Background Color so scanners can read the code reliably. If you add a logo to the center, make sure it’s small relative to the code so it doesn’t obstruct too many of the scannable modules.
Step 3: Configure the App Install Page
When someone scans the QR code, they’re taken to a dedicated App Install Page. This page’s content is fully customizable under the same settings panel:
| Setting | Description |
|---|---|
| Page Title | The main heading shown on the install page (e.g., “Install Official Web App”). |
| Page Description | Supporting text displayed below the title, explaining the benefit of installing (e.g., “Access application instantly from home screen with offline sync.”). |
| Button Text | The label on the call-to-action button that triggers installation (e.g., “Install App”). |
Appearance Settings for the Install Page
Under the Appearance sub-section, you can further style the install page to match your brand:
| Setting | Description |
|---|---|
| Background Color | The page’s overall background color. |
| Text Color | Color used for the title and description text. |
| Button Background | Background color of the install button. |
| Button Text Color | Label color of the install button. |
Step 4: Preview Your QR Code and Install Page
The right-hand preview panel shows exactly what visitors will see:
- The generated QR code image, styled with your chosen colors and logo.
- Your site/app name (labeled here as “Site Owner”) and a “Scan to Install” caption beneath it.
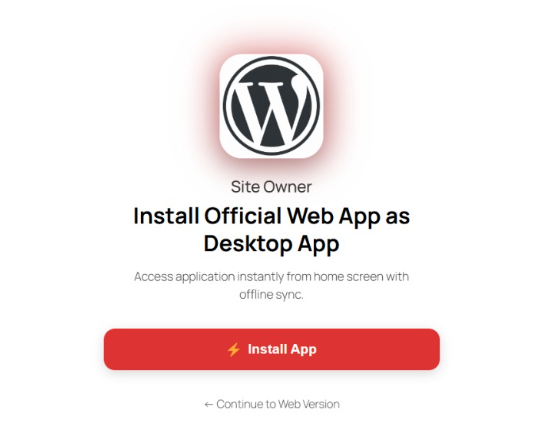
When scanned, the QR code opens the install page, which typically displays:
- Your app icon/logo
- The app name
- The Page Title you configured
- The Page Description you configured
- The Install App button
- A “Continue to Web Version” link, letting users skip installation and browse the site normally
Step 5: Download or Copy the QR Code
Once you’re happy with the design, you have three ways to use it:
- Download PNG — Saves the QR code as a PNG image file. Best for print materials, presentations, or anywhere you need a static image.
- Download SVG — Saves the QR code as a scalable vector file. Best for large-format printing (banners, posters) where you need the code to scale without losing quality.
- Copy QR URL — Copies the direct URL that the QR code points to, in case you want to share or link to the install page manually (without the QR image itself).
Step 6: Place the QR Code Anywhere on Your Site
Every generated QR code comes with a unique Shortcode, shown at the bottom of the preview panel (e.g., [hypwa_qr_install]).
To display the QR code on any page, post, or widget area of your site:
- Copy the shortcode using the copy icon next to the shortcode field.
- Paste it into any page, post, widget, or template where shortcodes are supported.
- The QR code will render exactly as configured — with your chosen colors, logo, and captions.
This means you can embed the same install QR code in multiple places across your site (footer, homepage banner, dedicated “Get the App” page, etc.) without regenerating it each time — all instances will reflect the settings configured in this panel.
How the User Experience Works End-to-End
- A visitor scans your QR code (from print, screen, or embedded shortcode) using their phone’s camera.
- They’re taken directly to your dedicated App Install Page.
- They see your branded title, description, and app icon.
- They tap Install App to add the PWA to their home screen — or tap Continue to Web Version to browse the site in-browser instead.
- Once installed, the app behaves like a native app icon on their device, offering instant access and offline sync, without needing an app store.