
How to Import Hyper PWA Settings and Restore Your Configuration
Location path: Hyper PWA → Tools
Overview
Hyper PWA lets you import a previously exported settings file to quickly restore your plugin’s configuration, including your general settings, integrations, and design/appearance options. This is especially useful when:
- Migrating Hyper PWA settings from a staging site to a production site
- Restoring your configuration after a plugin reset, reinstall, or update issue
- Cloning the same PWA setup across multiple WordPress sites
- Recovering your configuration after an accidental change
⚠️ Important: Importing a settings file will overwrite your current Hyper PWA configuration. This action cannot be undone. Make sure you export/back up your current settings first if you want to preserve them (see Export Configuration below).
Before You Begin
Make sure you have:
- A valid Hyper PWA export file — a
.jsonfile previously generated using the Export Configuration tool. - Admin access to the WordPress dashboard where Hyper PWA is installed.
- Confirmed that the export file was generated from a compatible version of Hyper PWA (importing settings from a much older or newer version may cause unexpected results).
Export Configuration
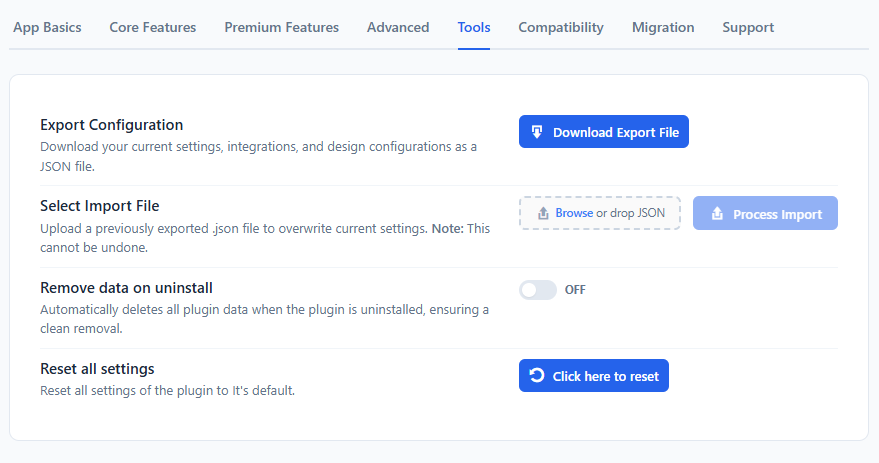
Before importing new settings, it’s good practice to back up your current configuration in case you need to revert:
- Go to Hyper PWA → Tools.
- Under Export Configuration, click Download Export File.
- Save the downloaded
.jsonfile somewhere safe on your computer (e.g., a “Backups” folder).
This file contains your current settings, integrations, and design configurations, and can be re-imported later if needed.
Step-by-Step: How to Import Hyper PWA Settings
Step 1: Navigate to the Tools Tab
From your WordPress dashboard, go to:
Hyper PWA → Tools
Step 2: Locate the “Select Import File” Section
On the Tools page, find the Select Import File panel. It includes:
- A file upload area (Browse or drop JSON)
- A Process Import button
Step 3: Upload Your Export File
You can upload the file in either of two ways:
- Drag and drop: Drag your saved
.jsonexport file directly into the upload box, or - Browse: Click the Browse link, then select the
.jsonfile from your computer’s file picker.
Confirm that the correct file has been selected before proceeding — the filename should typically appear in the upload field once selected.
Step 4: Process the Import
- Click the Process Import button.
- Wait for the system to read and apply the file. This usually takes only a few seconds, depending on the size of the configuration.
- You should see a confirmation message once the import completes successfully.
Step 5: Verify Your Restored Configuration
After the import finishes:
- Check the other tabs — App Basics, Core Features, Premium Features, Advanced, and Compatibility — to confirm that your settings match the imported file.
- Test key functionality (e.g., PWA installability, push notifications, offline mode, or any integrations) to make sure everything is working as expected.
- Clear your site/browser cache and, if applicable, regenerate your service worker so the changes take effect on the front end.
What Gets Imported
Based on the Hyper PWA export/import structure, the following are restored from the .json file:
| Category | Included in Import |
|---|---|
| General/App Basics settings | ✅ |
| Core Feature configurations | ✅ |
| Premium Feature configurations | ✅ |
| Design settings | ✅ |
| Integrations | ✅ |