
How to Migrate From PWAforWP to Hyper PWA Without Losing Your Settings
If you’re currently running PWAforWP on your WordPress site and want to switch to Hyper PWA, you don’t need to rebuild your Progressive Web App configuration from scratch. Hyper PWA includes a built-in migration tool that automatically transfers your settings, design preferences, and configuration data in just a few clicks.
This guide walks you through the entire process, step by step.
Before You Begin
A few quick checks will make your migration smoother:
- Back up your site. Always take a full backup (or at least export your database) before running any migration tool, even an automated one.
- Keep PWAforWP installed until migration is confirmed. Don’t deactivate or delete PWAforWP until you’ve verified that Hyper PWA is working correctly with your migrated settings.
- Review your PWA Health status. Hyper PWA’s dashboard sidebar shows a live health check. Address any critical issues (like HTTPS being disabled) either before or immediately after migration, since these affect whether your PWA functions correctly regardless of migration status.
- Note your current PWAforWP settings. While migration is automated, it’s good practice to screenshot or note down your existing app name, icons, and offline page settings so you can visually confirm everything transferred correctly.
Step 1: Install and Activate Hyper PWA
If you haven’t already, install Hyper PWA from the WordPress Plugin Directory (or upload the plugin ZIP) and activate it. You do not need to deactivate PWAforWP first — both plugins can remain active during the migration process.
Step 2: Open the Migration Panel
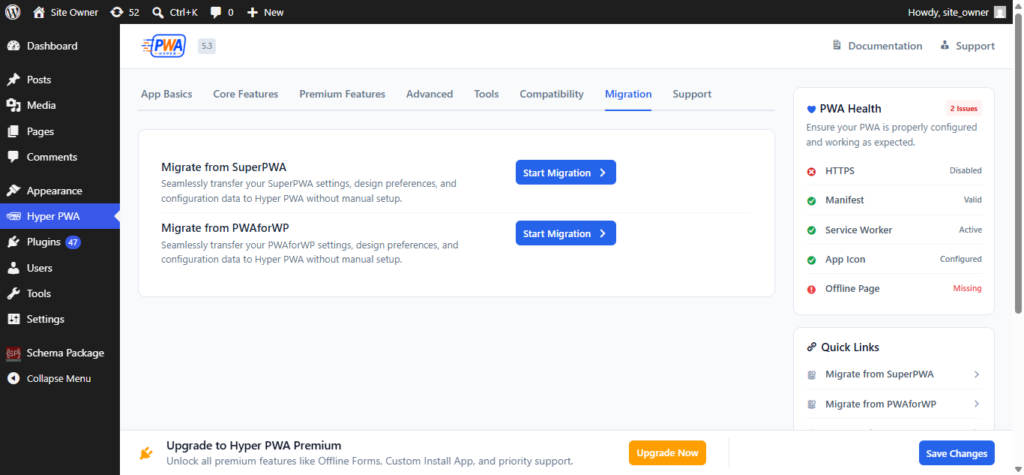
- From your WordPress admin sidebar, click Hyper PWA.
- In the top navigation bar, click the Migration tab.
You’ll see two migration options here:
- Migrate from SuperPWA
- Migrate from PWAforWP
Since you’re moving from PWAforWP, you’ll use the second option.
Step 3: Start the Migration
- Locate the Migrate from PWAforWP card. It reads: “Seamlessly transfer your PWAforWP settings, design preferences, and configuration data to Hyper PWA without manual setup.”
- Click the blue Start Migration button next to it.
Hyper PWA will scan your existing PWAforWP configuration and automatically import the relevant data into its own settings tables. This typically includes:
- App name and short name
- Theme and background colors
- App icons (where available)
- Start URL and display preferences
- Any other design and configuration values PWAforWP has stored
Step 4: Review the Imported Settings
Once the migration completes, don’t just assume everything is perfect — take a minute to verify:
- Go to App Basics and confirm your app name, description, and icons match what you had in PWAforWP.
- Check Core Features and Advanced tabs for any settings that may need manual confirmation (some highly custom PWAforWP configurations may not have a 1:1 equivalent in Hyper PWA).
- Look at the PWA Health panel in the sidebar. This gives you an at-a-glance status check:
| Health Check | What It Means |
|---|---|
| HTTPS | Must be enabled for your PWA to function. If disabled, your site isn’t served over a secure connection. |
| Manifest | Confirms your web app manifest file is valid and being generated correctly. |
| Service Worker | Confirms the service worker (which enables offline functionality and caching) is active. |
| App Icon | Confirms an app icon is configured for install prompts and home screen display. |
| Offline Page | Confirms a fallback offline page is set. If missing, users won’t see a proper page when offline. |
If migration carried over incomplete data, you may see issues flagged here (for example, a missing offline page) that weren’t present in your old PWAforWP setup. These are quick to fix manually in the relevant settings tab.
Step 5: Fix Any Flagged Issues
Using the example health panel above:
- HTTPS Disabled: This isn’t something the migration tool controls — it depends on your hosting/SSL setup. Make sure your site is served over HTTPS, since PWAs require a secure context to register service workers.
- Offline Page Missing: Go to the relevant settings tab (usually under Core Features or Advanced) and set or create an offline fallback page.
Resolve these before moving on, so your PWA is fully functional post-migration.
Step 6: Test Your PWA
Before removing PWAforWP, confirm Hyper PWA is working correctly:
- Visit your site in an incognito/private browser window.
- Check that the browser offers an “Install App” or “Add to Home Screen” prompt.
- Install the PWA and confirm the correct name, icon, and splash screen appear.
- Turn off your network connection and reload the app to confirm the offline page displays correctly.
Step 7: Deactivate PWAforWP
Once you’ve confirmed Hyper PWA is fully functional with your migrated settings:
- Go to Plugins in your WordPress admin sidebar.
- Find PWAforWP and click Deactivate.
- Optionally, click Delete to remove it entirely once you’re confident you no longer need it.
Tip: Running two PWA plugins simultaneously (both active) can sometimes cause conflicting manifest files or duplicate service worker registrations. It’s best to deactivate PWAforWP promptly after confirming your migration was successful.
Step 8: Save Your Changes
Don’t forget to click Save Changes at the bottom of the Hyper PWA settings screen after making any manual adjustments, so nothing is lost if you navigate away.
Frequently Asked Questions
Will migration overwrite any existing Hyper PWA settings? If you’ve already configured Hyper PWA manually before migrating, review the imported values carefully — migration may overwrite fields with PWAforWP’s data. It’s best to migrate before doing extensive manual configuration in Hyper PWA.
Can I run the migration more than once? Yes. If you continue editing PWAforWP settings after an initial migration, you can typically re-run Start Migration to pull the latest data, though this may overwrite any changes you’ve since made in Hyper PWA.
What if some settings didn’t transfer? Not all plugin-specific features have a direct equivalent between PWAforWP and Hyper PWA. If something is missing after migration, check the App Basics, Core Features, and Advanced tabs and configure it manually — this is usually only needed for a small number of edge-case settings.
Do I need the Premium version to migrate? No — migration is a core feature. However, some destination settings (like Offline Forms or Custom Install App prompts) may require Hyper PWA Premium if your PWAforWP setup used equivalent premium features.