
How To Configure UTM Tracking In Hyper PWA
UTM Tracking in Hyper PWA allows you to automatically append UTM parameters to your Progressive Web App’s start page (start_url) defined in the Web App Manifest.
This helps you identify users who launch your PWA from an installed app inside analytics platforms such as Google Analytics, Matomo, Plausible, or any other analytics solution that supports UTM parameters.
Note: Hyper PWA only adds UTM parameters to the start_url in the manifest. It does not modify any other URLs on your website.
What Is UTM Tracking?
UTM (Urchin Tracking Module) parameters are special query strings added to URLs to help analytics tools identify where visitors come from.
Example:
https://example.com/?utm_source=pwa&utm_medium=app&utm_campaign=summer_saleWhen a user launches your installed PWA, the app opens using the configured start_url, allowing your analytics platform to record the visit with the specified UTM values.
Available Fields
The UTM Tracking section provides the following fields.
Source
Specifies where the traffic originates.
Example values:
pwa
mobile_app
homescreen
installed_app
Result:
utm_source=pwaMedium
Defines the marketing medium.
Example values:
app
mobile
organic
shortcut
Result:
utm_medium=appCampaign
Used to identify a specific marketing campaign.
Example values:
summer_sale
launch
black_friday
new_users
Result:
utm_campaign=summer_saleTerm
Normally used for keywords or additional campaign information.
Example values:
premium
wordpress
shopping
electronics
Result:
utm_term=wordpressContent
Used to differentiate similar campaigns or identify specific content.
Example values:
homescreen_icon
app_launch
welcome_screen
notification
Result:
utm_content=homescreen_iconHow To Configure UTM Tracking
Step 1: Open Hyper PWA Settings
Navigate to:
WordPress Dashboard
→ Hyper PWA
→ Core Features
→ UTM Tracking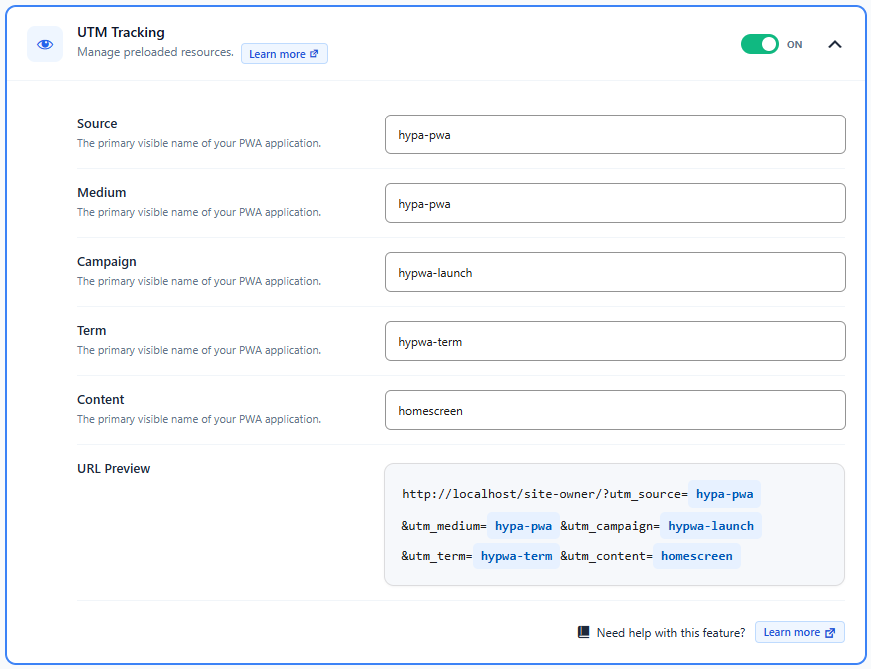
Step 2: Enter UTM Values
Fill in any of the available fields.
Example configuration:
| Field | Value |
|---|---|
| Source | pwa |
| Medium | app |
| Campaign | launch |
| Term | wordpress |
| Content | install |
You may leave any field empty if you do not need it.
Step 3: Save Settings
Click the Save Changes button.
Hyper PWA regenerates the manifest with the configured UTM parameters appended to the app’s start URL.
Example
Suppose your current start URL is:
https://example.com/Configuration:
| Field | Value |
|---|---|
| Source | pwa |
| Medium | app |
| Campaign | launch |
The generated start URL becomes:
https://example.com/?utm_source=pwa&utm_medium=app&utm_campaign=launchIf your website already has a query string in the start URL, Hyper PWA safely appends the UTM parameters using the appropriate URL separator.
How It Works
When a user installs your PWA and opens it from their device:
- The browser loads the Web App Manifest.
- Hyper PWA provides the configured
start_url. - The configured UTM parameters are appended to the start URL.
- Your analytics platform receives the UTM values when the app launches.
- You can identify traffic originating from the installed PWA.
Verify It Works
Open your website in Google Chrome.
Open Developer Tools:
F12Navigate to:
Application
→ Manifest
Locate the start_url field.
You should see something similar to:
https://example.com/?utm_source=pwa&utm_medium=app&utm_campaign=launchBest Practices
- Use short, descriptive UTM values.
- Keep naming consistent across campaigns.
- Use lowercase values where possible.
- Avoid spaces; use hyphens (
-) or underscores (_) instead. - Only populate the fields you need.